iMovie for iPad - Traliers

I have to say, in the classroom setting, I usually get children to create movies from scratch.  I've been using iMovie software, found on apple computers, for years and never really looked at the movie trailer option.


That was until I discovered the iMovie app on the iPad.  This is so much more user friendly...imagine trying to walk around with you laptop or having to record all the footage on a camcorder.  Then importing this footage into iMovie and then drag and dropping the footage into the right frame.

With the iPad its so much more portable.

So why use iMovie trailers in the classroom?  

I think it comes down to your purpose and reason for using them.  My class created their trailers at the beginning of the school year, so my purpose was to focus more on social skills.  I wanted different pre-selected groups to work together, problem solve and work collaboratively to create their movie trailer.

What did we do:
I shared the iMovie trailers with the children.

I gave them the option of choosing from the following iMovie trailers because they could have 2 - 6 characters...

Superheroes - 2 - 6 characters
Expedition - 2 - 6 characters

I have to say I felt redundant...I walked around and checked up on each group, and took some footage for children, for instance if they needed a group shot.

The children were managing themselves and working out their problems.  I called them in part-way through their project and they shared their work with others.

Tips for children:
The person filming needs to say Action, once the counter counts down.  No voice is recorded for the movie trailer, so it doesn't matter how much noise they make while filming.

Props - some children brought different clothes and created props for their movie trailer.  This was much better than children wearing their school uniform.

Storyboard - Click here if you want to use storyboard help sheets.  You can print these out.  Some groups used these, other children planned their ideas on paper.

Other ideas....
I think you could also use movie trailers as a way in for children to create their own movie trailer from scratch.  Why not use a movie trailer and get children to create on about a book they've been reading or for an original story they've written.....

Below is and example of one movie trailer my class made.

Show Me - Triangle Pretzels

Shape Up! Fun with Triangles and other Polygons, by David A. Adler is a must have for teaching children about polygons.  I've used this book before to inspire a maths session about triangles.

Children love the idea of using pretzels to make triangles...then break one side of the triangle, eat it and put the triangle back together.  What do you notice?  What is the same?  What is different?

While the children were exploring triangles with pretzels I had an iPad which was running via Reflector.  I filmed the children, so they could see what their fellow classmates were doing on the data projector.

My first session focused on making different triangles and getting the children to draw different triangles.

I made the ShowMe below, so children could watch this independently and use it for consolidation.

I also use this book to introduce right angled traingles....that's my next ShowMe to be made.

Click here to see more of my whiteboards using ShowMe.

How to Write a Personal Recount...

In the holidays I had lots of fun creating my first eBook using iBooks Author.  I entered my ebook 'How to Write a Personal Recount,' into the Cyclone Computers Competition in New Zealand.  I submitted my eBook into the Teacher category, K - 6, and was excited when I heard I got first place in my category.

I've put my book on the iBookstore, and it's FREE!  I had no other option, as I'm in New Zealand.

Overall, I found iBooks author easy to use and anything I wasn't sure of I googled to find the answers or used the help section, in iBooks Author.

I did some background reading on iBooks Author before I started to construct my ebook.  The main thing I needed to know was what size was the maximum an eBook could be (which is 2GB).  I wanted to add video snippets and at the start I wasn't sure how much MB this would use.

I found some useful links:
100 page Guide to Publishing with iBooks Author
iBooks Author Publishing your first eBook
25 iBooks Author Tutorials from DIY Journo

I think I spent about twelve hours planning my eBook.  I wanted to create an eBook that teacher's could use with children that was visually rich.  I added video snippets to support the concepts covered and used a variety of widgets.

I used a good quality camera to take a range of photos of the two stars of my eBook, Miss Poppy and Crazy.

I developed the analogy of using a hamburger to help children learn the structure of writing a personal recount about seven years ago.  I've used this in the classroom and it provides children with a visual prompt to construct their recount, like have you written the top of the hamburger bun...the Setting?
Chapter one of my eBook deals with the personal recount structure.

Once children are confident with the recount structure I move on to talking about how to make their hamburger really delicious, so the reader wants to keep munching their way through their recount, (Chapter 2 Personal Recount: The Language).

Snapshot taken from a page in my iBook 'How to Write a Personal Recount.'


Apple iPads - Apps Galore...

What tool to use to enhance the curriculum and integrate into teaching and learning opportunities for your students?

If you're just new to using iPads with your children, in the classroom situation, it can seem absolutely daunting.  Lets me honest there are so many apps....it can make your head spin!

When I first started out I have to admit I started with maths apps in the classroom...which is pure substitution I know....  Upon reflection do I feel bad about that?  Absolutely not...I was just beginning my iPad journey.  One year down the track, if this was still the case then I would be worried.

I've been making a conscious effort to explore a variety of different open-ended apps and use these in the classroom.

So, if you're just starting out here's a few links I found useful.

I want my students too...is an excellent starting point if you are looking for apps in the classroom and you have a specific purpose in mind.

 The Padagogy Wheel if you like using Blooms Taxonomy.  This was developed by Allan Carrington.
There's many teachers blogging about using iPads in the classroom, below are a few examples...

iTeach with iPads
Langwitches Blog
iPad 4 Schools

I decided to subscribe to iPad Apps for School.  This has been one of the best things I've ever done.  Most days I receive an email with an app that's being reviewed.  You get a direct link to view the app in iTunes, and a brief app review.

Allanah's website on the Initial iPad Setup is user friendly and has a clear layout.  There's headings for apps, like The Arts, Productivity and Creating iBooks. Each app has a direct link to the iTunes store and a few sentences about what each app is about.

Below I've embedded a slide share from Silvia Rosenthal Tolisano.  This is definitely worth viewing and gets you reflecting on how you're using iPads in the classroom.


There are also apps out there that let you know of apps that have gone free.  One app, no surprise is called Apps Gone Free.

If you're new to using the iPad and want some tips, click here to view a pdf '100 iPad Tips and Tricks.'

From Apps in Education.
What do I look for in a app...

Intuitive and Interface - Can you or the children work out how to use this app, is it easy to use? I have to say I like to spend fives minutes exploring an app.  I think an app can tell you a lot in five minutes. What basic information can I find out in five minutes....after looking at a lot of apps you'll find many have the similar symbols, like the printing symbol.

Sharing - are there a variety of options for children to share their work....like Dropbox.  Or can the work only be viewed if the end user has that same app.  The iPads my children use are 'Supervised,' using Apple Configurator, so we can't just plug them into a computer and get their work off.

Open ended - can the children create something that they couldn't do before?  How open-ended is the app?

Last of all I've found, Exploring the SAMR Model, and keeping this at the back of my mind, a focus for when I'm planning learning experiences for my class.


For more information about SAMR you can listen to Dr Puentdeura's podcasts at iTunes U.

How to Build a Wresting Ring...

I'm a mum, and what do teachers do on their school holidays? They entertain their own children. These holidays I have been building a wrestling ring and if you are really over keen, you could build one of these for your classroom boys, well girls too...  Imagine the play on those rainy days and imagine the noise!

This wrestling ring is not to scale, the MDF I used was cut to 41cm x 41cm (16"). The paint I used is from the tester pots you buy from Resene for about about $5.00.

Materials Needed:
* MDF board cut to size
* 1 metre of 1cm x1cm pine (posts)
* 2 metre of 1cm x 4cm pine
* Small screws
* UHU glue
* Liquid nails
* x3 Foam board
* Quilters batting or thin sponge
* White cotton cloth
* White paint
* Black paint
* Paint brushes
* Pencil and ruler
* Roller
* Drill
* PVA and Modge Podge
* Sellotape
* One RAW wrestler for size
* 4 metres thick round elastic
* Glue gun
* Metal curtain eyes (from packets of hooks and eyes)
* Double sided tape

How I made it:
I cut the MDF to size and I used a wrestler as my guide for the base.  Could I throw him around easily, would two fit in the ring, would four fit in? In the end I came up with 41cm x 41 cm square.  This makes the wrestling ring not too big and not too small.

Posts:
Next I cut out 1cm squares on each corner of the base, to fit the posts (paint these before you make the ring). I made each stick for the post 20 cm in length.

Sides:
On two ends of the side framing I attached the two posts with screws (diagram 1). I had also glued these in place with liquid nails before using screws. I had a problem doing this as my liquid nails was so old it had gone hard in the tube. So my gluing was slightly messy.  Paint the edge of the wood black. Be so careful you don't get black paint on the pad. This edging will tidy up and re enforce the edge of the wrestling ring later.

The base:
I  stuck pieces of cut foam to the base with PVA then weighted it down so the glue could set. I also used tape to keep the seams together. Make sure you use a roller to remove any glue bubbles from the foam. Any edges that lifted up I used UHU glue to re-glue them down.

When the glued board is dry, paste again this time on top of the foam with Modge Podge. Next stick on quilters batting or sponge to help stop some of the noise and to give those plastic wrestlers a softer fall. Got to keep those wrestlers looking good or I'll have to buy more!

Covering the pad:
Time to cover the pad...I just used a non-stretch white cotton fabric. This was stretched and smoothed over the padded base, then glued underneath using the glue gun. To tidy up the bottom of the pad you can glue another square of fabric underneath if you like.

The Ropes:
Nearly there, next I worked out where I wanted the elastic to be and marked the wooden posts accordingly. I left a slightly bigger gap at the bottom so those 'plastic wrestlers could throw themselves into the ring easily'...just like on TV.


Attaching the eyes:
Before you finally put it all together you need to screw in the 12 metal eyes.  This is easier to do before you assemble the wrestling ring.


Putting the wrestling ring together:
I attached the two sides of framing (that had one post at each end - see diagram 1), onto opposite ends of the MDF base. I made a couple of mistakes and made holes where I shouldn't have.  No worries though, I'll just patch them up with filler, sand and then repaint the sticks. I also split one too, so perhaps I could have used thicker sticks...

I then measured and cut pine (4cm x 1cm), to make the other two sides.  I attached these two sides to the base and used screws at each corner.

Important:
Make sure the posts are straight or you'll have a wonky wrestling ring.

Attaching the ropes:
Thread the elastic through the metal eyes, knot, cut ends, and glue. Do the same to the other two.
Cut some black plastic tape into strips, wrap each strip around each metal eye, then over it and stick down. This makes the ropes look more realistic.

Tip:
Turn the wrestling ring upside down and place some self sticking plastic circles onto the underneath of the posts. I later cut the circles to fit the post flush. This will save your coffee table from getting scratched.

Finally it's almost finished:
Time to try it out...did it past the test? Yes it did!

To complete the ring:
Attach a black skirt to the sides so it looks like a real wrestling ring. I haven't finished this part, the bottom pic shows the double sided tape ready to attach the fabric skirt. I used a black stretch fabric but it is too light in weight and I wasn't happy with the result. So I'm off to buy a thicker stronger fabric. I'll post pics when I make it..


Attaching double sided tape for fabric sides

Figurin' Out Apple Configurator - Assign

I've been responsible for deploying over sixty iPads in a school which is small fry when I google and find schools deploying over 300 plus devices.  Click here to read my post on 'Figurin' out Apple Configurator.'

In Apple Configurator, under 'Supervise' I created groups for each class, like 'Room 13.'  I then selected the iPads I wanted to add to this group, and dragged and dropped them into the Group 'Room 13.'

Some of our junior classes wanted different apps, so I created a Junior back up and a Senior back up.  In my last post I blogged about creating a back-up to deploy iPads.  A back up can be done in the prepare pane or in the 'Supervise' pane (if the supervised iPads have already been through the prepare stage).

We decided to put about six iPads into each classroom.  At this stage we still need to sort out a few things, like printing and Dropbox.  So for this reason I decided to 'Assign' the devices.  'Assign' allows you to back up users work, data, and settings.  If you don't want to use 'Assign' you can just configure your iPads in 'Supervise' and give them to the end user.

In 'Assign' I had a Group, ie Room 13.  For this group I had to create five Users, ie Rm 13-1, Rm 13-2, Rm 13-3, Rm 13-4, Rm 13-5.  The reason for this is you can't of course 'Assign' five iPads to one classroom.  I could then 'check out' five iPads to this group.  If you are setting up an iPad Cart click here for a pdf with more information.


Assign...
I really played around with 'Assign'...and found out a few things.  So, lets use the example above.  I assigned a group of five iPads to Room 13.  I hadn't yet given these iPads to the class.  After assigning to this group I noticed I'd forgotten to add a few apps and some apps needed updating.

First I 'checked in' all the iPads for this group.  I removed the restrictions.  After updating some apps in iTunes I imported them into Apple Configurator.  The easiest way to do this is to sort by dated modified, this puts the most recent apps at the top of the list.

I then selected some apps that I'd forgotten to add.  Then I clicked 'Apply.'  Once the apps were added I some in folders on the iPad itself.  I checked the layout of the iPad and went and created a new back-up.

I then applied this new back-up to the other four iPads (I removed the restrictions first).  Wow!  I thought this was great...all the iPads had the new apps, the apps that needed updating, and they all looked the same.  I then went into Assign and assigned this group of iPads back to Room 13.

Hmm....after checking out these iPads in 'Assign' the iPads all looked different!  The new apps were there...but not in folders.  The iPads had reverted back to the original back-up applied to the iPad.  In fact I had discovered that when you 'Assign' out a group of iPads to the same group/users it remembers the last configuration used, i.e. the back-up used to prepare the device, or the back-up applied in the 'Supervise' pane.

To get around this I deleted the Group and Users in 'Assign.'  I created a new Group and Users, checked out the iPads and they all looked exactly like the most recent back-up I'd applied.  Yeah!

In the future I am thinking that if I needed to do a lot of app updates or add apps would it just be easier to create a new back up on one device and use this to configure a groups of iPads for each class.  However, if I were going to continue to use 'Assign' I'd need to create a new group/users for each class. If I didn't use 'Assign' all iPads would look the same and this would be a much easier process...

Click here to watch a video on Ownership Models.

Figurin' Out Apple Configurator


This is my journey so far with Apple Configurator....

Lets just say over the last couple of months I've made it my mission to find out all I can about Apple Configurator.  I'm at a school and I'm jointly responsible for the deployment of over sixty iPads.

Information that I found useful:

iOS 6 Education Deployment Guide
Apple Configurator Help
Introduction Video on Apple Configurator
IT Resources
Using Apple Configurator for iOS Deployment - YouTube video
Mr G Online
AC: Using Volume Purchase Program (VPP) Redemption Codes
Supervising Devices with Apple Configurator
iTunes U Collection - search Apple Configurator in the iTunes U tab

As you know iPads are designed for personal use.  We're using Apple Configurator to supervise groups of iPads that will be placed into classrooms.

We went through the process of setting up a VPP - Volume Purchase program.   This was easy enough, we had to wait a few days to get confirmation and then assign two facilitatiors.  You have to make sure the Apple ID's you create for VPP are not already assigned to any other iTunes account.

After this you need to create another Apple ID in the iTunes store.  This is not the Apple ID used with VPP or the facilitator's Apple ID's.  You need this Apple ID to download apps into iTunes.  You then import these apps into Apple Configurator.   For example, if you purchased twenty license codes for Puppetpals in the VPP store, you use one of these codes (from the spreed sheet you download from the VPP store), to redeem Puppetpals in the iTunes store.  You then import this paid app into Apple Configurator.  Apparently if you then re-download the spreedsheet and import it into Apple Configurator again this code is reassigned to another device.

Attempt One:
At first bizarre things happen, Apple Configurator kept unexpectedly quitting, it would fail to fully prepare a device.  Then I would plug the same device back in to Apple Configurator and it would go to supervise...then unexpectedly quit again.  The problem turned out to be some corruption with the user account on the mac computer.  The tech created a new user account and copied over the relevant files.  This seemed to fix the problem.

Attempt Two:
How exciting Apple Configurator was working!  I deployed around 55 iPads.

Now, I had a pile of iPads (from attempt one), that had gone through the prepare stage, some had apps installed, some didn't...I have to say I left these iPads at the bottom of the pile to sort.

Now what to do?

These are some of the steps I took to sort out these random iPads...I called them the lemons.  As they were all different.  I'm sure there's probably other ways too.

Well there's two ways you can sort these iPads...

Option 1: Configure them using a 'Restore' you've already created

Option 2: Configure one iPad and create a 'back up'

Lets start with Option 1:  Configure the iPads using a 'Back up) you've already created

Step 1:  I plugged in a small groups of these iPads.  I decided to remove all profiles (some iPads had them installed and some didn't).  It's really important to remove the 'Restriction' profile, especially if you have it set not to allow the installation of apps. Note: If you don't do this you will get a yellow triangle with an explanation mark, apps will not get installed (this is the same for any iPad you put back into Apple Configurator to add iPad apps, or update - always remember to remove your restriction profile first).

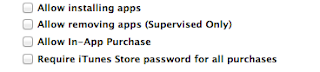
This is found under 'Restrictions' in the profile setting.  If you tick the boxes you are allowing users (on a supervised device), to install apps, purchase apps.  Of course for supervised devices, using the Ownership Model, you don't want any of these boxes ticked.  
Select the iPad or group of iPads, untick the 'Restrictions' then click Apply.  This will remove the restrictions from your device.  You should then have no problems adding apps.
Step 2: Working in the Supervise pane I then clicked on 'Apps.'  Depending on how many apps you have it's easier to select them all and then untick the ones you don't want. The quick way to do this is option+click.  This will select all the apps.  If all the apps are selected and you click option+click, this will deselect them all.

Why not simply just go straight to 'Restore' and use the back up already created?  Well, the simple answer is this won't work.  The back-up doesn't contain the apps it contains the settings.  You must install the apps on the devices before you select any back up from 'Restore.'

I then clicked 'Apply,' and the apps were installed onto my group of iPads.  Note: if you have just opened Apple Configurator, once the apps start to get installed on the iPads you will be asked to enter the iTunes Apple ID/password you are using with Apple Configurator.

Step 3: Now you have the apps installed on the iPads.  Select the back-up you wish to apply to these iPads under 'Restore.'  Select the profiles, ie Wi-Fi, Restrictions.  Then click 'Apply.'  You should have all iPads looking like the backup.

Option 2: Configure one iPad and 'back up' - use this back-up to configure more iPads.
Note:  This can also be done in Prepare - but remember my first attempt went wacko!  Below is an example of an iPad which shows up under the 'Supervision' pane.  This is also how you can create any new back-up of any iPad that has been prepared.

Step 1: Working with just one iPad, in the Supervision pane (under Settings), I made sure all restrictions were removed (see Step 1 above, under Option 1).  I installed the apps I wanted.

Step 2: Once all apps were installed I applied the profiles, ie Wi fi, Web Clips (you can apply the Restrictions profile too - if you do this here you won't be able to delete apps on the iPad, but you will still be able to move apps around into folders).  If you swipe the lock screen the apps on the iPad will be scattered everywhere.  Due to some devices not being prepared fully I did have to go through the initial set-up on the iPad..ie select your country...skip the Apple ID part, and make sure you 'Enable location services.'  If you don't you might find the day/time will be incorrect on the iPad (you don't want a backup with that!).

Select apps to be installed onto the iPad, in 'Supervise' pane select 'Apps.'
Step 3:  I put most apps that came with the iOS, like address book, game centre into a folder called 'Other Stuff.'   Depending what apps children are using you may have folders for maths apps, thinking apps (ie Skitch, Idea Sketch) and so forth.  Most of the paid apps I didn't put into folders.  I set the dock with some high usage apps, like Safari and Camera, (I think that's what its called on an iPad).  I went into the settings, on the iPad, and changed the wall paper, opened Safari and set the home screen.  That's about all the restrictions I applied to the iPad itself.  If you're using Web Clips, don't put the icons on the first page, they get moved when you apply a back up.  I placed any Web Clips as the last icons on the iPad.  Then in 'Supervise' next to 'Restore' select 'Back Up.'  Give your back up a name.  Check the iPad looks like it should.  Then you're ready to use this back-up to deploy other iPads.

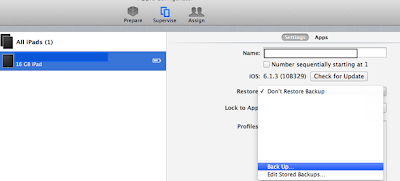
Creating a back up, select 'Back Up' next to 'Restore.'


Remember:  If you tick apps you want to add to a device, plug this in, don't remove your restrictions (see Option 1, Step 1),  and click 'Apply' you will get  a yellow triangle.  If this happens untick the app/s you just ticked to be installed, click 'Apply.'  Then untick the 'Restrictions' click 'Apply.'  Now you are ready to add your new apps to the device.
If this happens again, check how many license codes you have for paid apps.  I found I had one code left for Garageband which had actually been redeemed.  Apple Configurator installed the apps on the iPad until it got to Garageband.  It then stopped and a yellow triangle appeared.  Once I unticked Garageband, in apps,  and clicked 'Apply' all apps were installed onto the device.

I've now started to play around with Assign...so that will be my next post... 

Don't Climb Out of the Window Tonight


I've always loved the book 'Don't climb out of the Window Tonight,' written by Richard McGilvray and illustrated by Alan Snow.

The Writing
Don't climb out of the window tonight because....

What a great sentence starter to give children to inspire imaginative writing.

At the start I only showed the children the front cover of the book, as I didn't want this to influence their own ideas.  We talked about what could be outside the window, at night time, that would really want you to just stay in bed.  The children were told that their writing and illustrations would be turned into an ebook and their audience would be other children.

I then modeled how they could play around with a sentence and make it more interesting.  The children also practiced this with some class examples.  One example: a big clown is smelling flowers.  How could we make this more interesting and use strong nouns to help our illustrations?  'A chubby clown is smelling roses,' or 'A giant clown is sniffing roses.'

Once they had three concepts it was time for them to start exploring the sentence they were going to write.  When each child thought they had an interesting sentence they wrote this on a strip of paper.  Each sentence was placed on the whiteboard, so they could be given any feedback to improve their writing.


The Illustrations
It was now time to read the class 'Don't Climb out of the Window Tonight,' to inspire their illustrations.  I wanted the children to really focus on the cross-hatching technique Alan Snow had used to illustrate this picture book.


I used a beginners tutorial from YouTube, on cross hatching, done by HelloArtsy.  Children also used paper to practice their cross hatching skills and also colouring pages.

When the children had finalised their composition each child drew their illustration onto good quality A3 paper.  They also used pencil to put in their cross hatching marks.  They went over the pencil lines with a permanent marker, like a vivid.


The children erased all of their pencil lines and used watercolour pencils to add colour.


Making the ebook
Each child came to school with their pajamas, soft toys, they messed up their hair and had a photo shoot behind a black screen.  I got one child to draw the house, with windows, that would be used to insert two photos of each child into the window.


This page would be used for the sentence Don't climb out of the window tonight because..... then the next two pages would have their sentence and illustration.  This would repeat until the end of the book.


I gave the job of recording the voices to a group of children in the class.  Each child read out their own sentence and each peer read out Don't climb out of the window tonight because...

As you can't insert an ebook into blogger I've uploaded a pdf version to Slideshare, of course you won't be able to hear the children reading their story.

Show Me...

What can you do with 'Show Me?'  I think the question is what can't you do?  This app is free, and what you see is what you get.  You won't be expected to purchase any upgrades to get more usage out of this app.

The ShowMe voice blog is brilliant and has some basic tips to get you started.  I've just set up an account for children.  This is a new feature for ShowMe.  Though, I decided to just add a classroom student account, so I put my school name and room number instead of the child's first and last name.  I will see how this goes, at this stage I just don't think every child in my class needs their own ShowMe account.

To set up student accounts login to ShowMe and the click on 'Edit Profile.'  Along the sidebar you will see 'Students.'  You can then click on this and add your students.  You will then get an email to say you have added a student/s and their ShowMe login and password.

ShowMe interface...

I wanted to use 'Show Me,' to reinforce some of the maths concepts covered in class.  Click here to view one of my ShowMe whiteboards.

Some tips for using ShowMe with students:  
At first some children in my class went away and recorded five voice over whiteboards using ShowMe, when they should have just made one ShowMe.  They forgot about the pause button!  So make sure you remind children about this.  When they've paused the recording they can then clear the screen...insert more photos and so on.

If you take a photo in the ShowMe app this will not be added to the camera roll (also the same in iMovie).  That means if the children muck up their ShowMe they will have to retake all of their photos.  If children are capturing their learning and thinking spontaneously then it would be fine to just take photos while in the ShowMe app.  However, if children are making a longer ShowMe and have done some planning on how best to do this, it would be better to take all photos with the iPad camera first. That way they are on the camera roll ready to be inserted into ShowMe.

This year my focus is to get children to use 'Show Me' to teach other children about geometry. Below is one example which had no teacher input.  Children were exploring how best to make 3D shape using a net.


Related Posts Plugin for WordPress, Blogger...